In the fall of 2019, our partners at the OSU Museum of Art had an exhibition dedicated to the history and artistry of stop motion animation (see Resources for link). The following project was inspired by one of the featured artists in that exhibition, Gabrielle Tesfaye, and her beautiful work The Water Will Carry Us Home, a work that features watercolor and ink puppets in a narrative about men, women, and children being transported on slave ships (see Resources for link). If you wish to show your student(s) this film for inspiration, we recommend watching it yourself first so you are prepared for the difficult content and questions. We had some great conversations and, as usual, were impressed with the students' keen observations and understanding.
This project was adapted for both our 6-9 year olds and our 10-12 year old students.
Objectives:
Students will watch Gabrielle Tesfaye's work, The Water Will Carry Us Home, and participate in a teacher-led discussion about the content, as well as the medium and aesthetic vision, of the work (see Resources for some suggested discussion questions).
Students will learn about identity: what it is, how it is formed, what they identify with, and how to express identity visually (see Resources for suggested discussion questions).
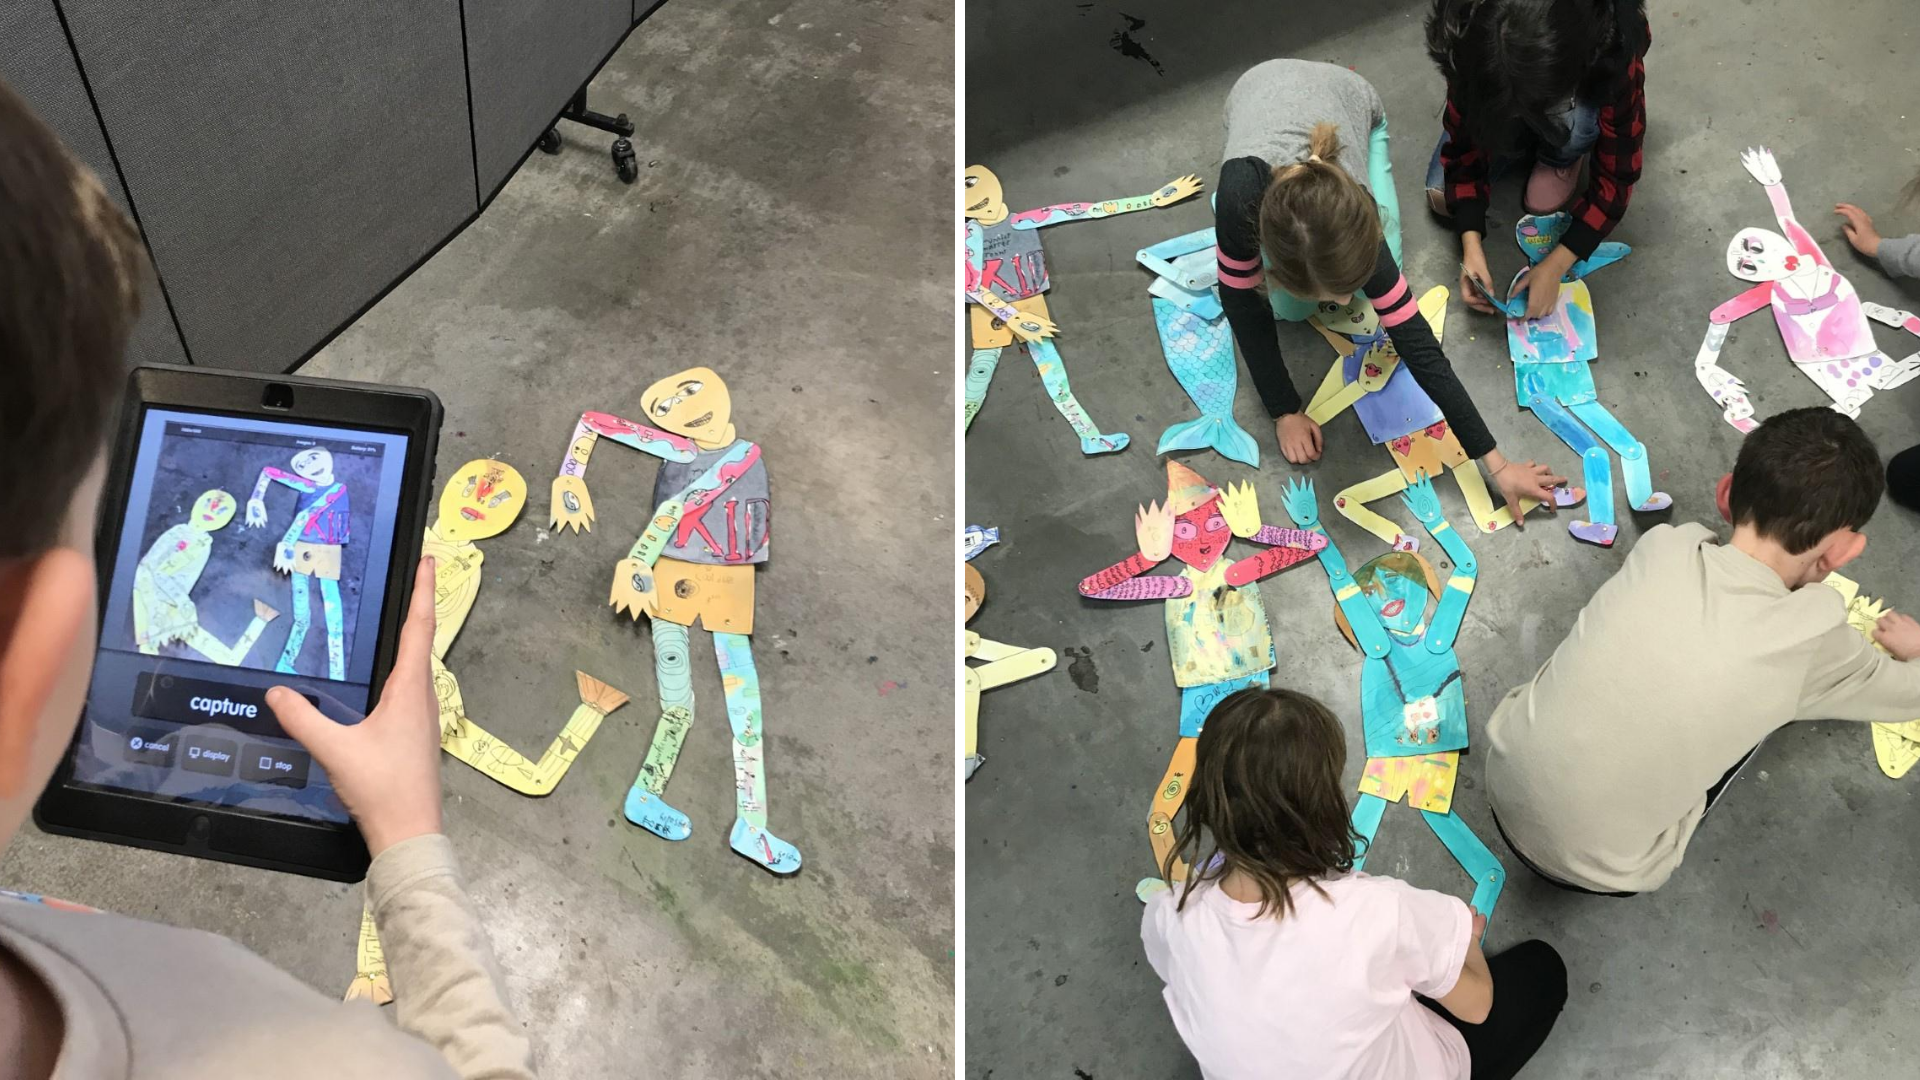
Students will create a jointed paper puppet that represents their identity.
Students will practice tracing, using scissors, drawing, and painting.
Students will learn what stop-motion animation technology is and how to use it to make a short film.
Materials:
This project was adapted for both our 6-9 year olds and our 10-12 year old students.
Objectives:
Students will watch Gabrielle Tesfaye's work, The Water Will Carry Us Home, and participate in a teacher-led discussion about the content, as well as the medium and aesthetic vision, of the work (see Resources for some suggested discussion questions).
Students will learn about identity: what it is, how it is formed, what they identify with, and how to express identity visually (see Resources for suggested discussion questions).
Students will create a jointed paper puppet that represents their identity.
Students will practice tracing, using scissors, drawing, and painting.
Students will learn what stop-motion animation technology is and how to use it to make a short film.
Materials:
- 2 or 3 pieces of 11 x 15 watercolor paper (per puppet)
- fine tip sharpie pen
- watercolor paint
- paintbrushes
- scissors
- puppet template (see Resources to download)
- 14 paper fasteners (per puppet)
- tablet or smart phone with a stop motion app downloaded (iMotion, Stop Motion Studio, etc.)
Steps: Puppet Making
1. Using the template provided, students trace and cut out all the pieces for the puppet from watercolor paper: head, torso, 2 upper arms, 2 forearms, 2 hands, shorts, 2 upper legs, 2 lower legs, and 2 shoes.
2. Students assemble their puppets by punching holes on the marked spots and connecting the pieces with paper fasteners (also called brads).
3. Students add details to their puppet using a black sharpie pen (marks must be made with a permanent marker so they won't bleed when water-colored over). These details can include: facial features, clothing, imaginative/symbolic body markings, jewelry, etc.
4. Students then use watercolor to paint the puppet. Realistic colors may be chosen or, as in the case of Tesfaye's puppets, students may choose to use fantastical colors to support or express an element of their identity.
Steps: Stop Motion Animation Film Making
1. Students familiarize themselves with the technology and concepts of stop motion by practicing without anticipation of a "film" (see Resources for tips on stop motion animation film making). This could be something as simple as making their puppet clap or jump.
2. Students spend some time creating a short "narrative arc" for their film. They could talk it out with a partner or sketch it out on a story board. Students may choose to create additional props or use other objects in the room to facilitate their story (see film examples below).
3. Students make their film. This can be done solo, with a partner, or in groups of 3-4, depending on your resources and students' temperaments and abilities.
Resources:
OSU Museum of Art's exhibition, Little Nemo's Progress: Animation and Contemporary Art: https://museum.okstate.edu/art/past-exhibitions/2019/little-nemo.html
The Water Will Carry Us Home by Gabrielle Tesfaye:
http://www.gabrielletesfaye.com/the-water-will-carry-us-home
Suggested discussion questions for The Water Will Carry Us Home
Suggested discussion questions on the topic of identity
Tips for making successful stop motion films.
http://www.gabrielletesfaye.com/the-water-will-carry-us-home
Suggested discussion questions for The Water Will Carry Us Home
Suggested discussion questions on the topic of identity
Tips for making successful stop motion films.
Stop Motion Video Example 1 https://youtu.be/q-DQb04M-Wc
Stop Motion Video Example 2 https://youtu.be/q-DQb04M-Wc